Friday, September 23, 2011

Checklist: Buying a Point and Shoot camera


This is one of the first things my friends wanted me to help them with when I announced my blog. In fact, I received so many queries that I thought I better post an article about it.

This article specifically deals with point and shoot cameras. If you want to know the different types of cameras, you can head over to my other article Choosing a digital camera – camera types for a quick refresher.

Now a point and shoot camera is ideal for the occasional photographer who does not want to go professional but would like to take good photographs. The main intention here is to preserve memories, and that, in my opinion has the highest priority always.

So while I’d love to write a long winded article about various camera features, I want to make this simple for you. Here is a checklist of the most common features of a Point and Shoot camera and what you should have in your camera deal:

Megapixels: For an enthusiast, 5-8 megapixels is a adequate buy. Any more and you’ll just end up paying for additional pixels you don’t really need.

Zoom: The larger, the better. Just make sure that the zoom range under consideration is optical zoom and not digital zoom. Ask the sales guy to show you where it says “optical zoom” on the box or camera.

Power: My bet is for a rechargeable Li-ion battery pack instead of individual AA or AAA batteries. This way you are safe from battery incompatibility and have a comparatively longer battery life. However, very few point and shoot cameras have this option. This can be a secondary feature for comparison though, so if its not there, invest in a good set of rechargeable AA or AAA batteries.

Scene Modes: While most of the pictures an occasional photographer would take will be in auto mode, there are times one would like to get creative without dabbling with a lot of technicalities. Hence the larger number of scene modes, the more flexibility you have with your creativity.

Ergonomics: Hold the camera and see if it feels comfortable. While a lot of cameras come with more or less a standard design, there are the weird ones too. Also it should be light enough not to weigh you down. Its all a matter of personal preference.

LCD Screen: Ensure that the screen is bright and large enough to view. If possible, also check out the display modes, which show up different information on the screen, provide guide lines etc. You should be able to hide all displayed information from the screen if necessary.

Storage support: Ensure that your camera supports external memory cards. It is a standard feature in most cameras, but some camera models rely on fixed internal memory only. External memory cards allow you to expand the memory storage capacity of your camera. Most cameras would come with a 1 Gigabyte capacity card, which can hold about 300 5-megapixel photographs. This is plenty for most users, provided you keep transferring the photos into your computer and empty out the memory storage card from time to time.

Easy to use controls: Most cameras have multiple buttons on them. Ensure that these are easy to press and clearly marked. This is important if you have large fingers or are not very comfortable with remembering symbols. A few new cameras have a touch-screen instead of buttons. While this may look fancy, it can often get frustrating if your touch screen does not register your touch when you need it. 

That is my list of features to watch out for when buying a new point and shoot camera. I’d love to have feedback whether this article was useful and if there is anything that is important and has been missed out.

[The image is only used for representative purposes and is in no way an attempt to position or promote any brand or make of digital camera equipment. Image courtesy and copyright: www.photographyreview.com]

Sunday, March 20, 2011

Photo – Supermoon


The night of March 19, 2011 was special in some ways, as the pretty moon came the closest to earth in 20 years. While a lot of people analysed and reanalysed what this meant and what repercussions this would have, a lot of photographers, amateur and professional alike, waited with bated breath for the celestial spectacle.

I sat up pretty late for the moon to get into position outside my window [my terrace was locked] and in a way, it was worth it. Got to see the moon in its splendour as well as experiment with shutter speeds and aperture sizes for the best exposure.

Here is one of my results:

Supermoon 2 

Chandamama, just as we all know and love him :)

Wednesday, March 16, 2011

Mobile Photo - A sunset at Bandra


Mobile phone cameras are one of the biggest boons for photographers. It allows you to carry a camera everywhere you go. True, its not all great shakes like a real camera rig, but something is better than nothing.

Lately, with all the hype about the Apple iPad coming to India, the cool wallpaper displayed on the stock photos of the iPad is one of the reasons so many people fall for it. Just for the record, the photograph is called “Pyramid Lake – At night” and is photographed by Richard Misrach. You can read more of the story of the official iPad background image.

Its a beautiful picture and worthy of being a wallpaper.

Bandra Sunset

When I walked on Bandra’s Bandstand Promenade recently, the sun had set about half an hour ago and the twilight created a beautiful picture. I was coming back from work and did not have my camera with me. But my mobile came to my rescue and I had my own wallpaper.

This is with a 3.2 Megapixel camera with autofocus [ I’m a poor guy :) ]. It might not be technically correct, but you can take good photos with a mobile camera.

Comments and feedback welcome.

Monday, March 7, 2011

Photo Tip: Managing your photos


The best part about digital photography is that you can just snap away happily without a limitation of number of photos you can capture, as against shooting photographs with film. While this is the happy aspect of digital photography, it also leads up to a big problem - too many photos.

The average amateur photographer captures around 150 – 200 photos in a single major event, like a wedding, a party or a vacation. Assuming there are 10 such events in the year, that is 2000 photos per year. Collecting, storing and processing those many images can be quite a challenge.

Most photographers address the problem by defining a process called a digital workflow. This is the flow of the photograph from the camera to the final product and to storage. There is no standard process for a digital workflow, because it depends on how and what the photographer does with the photos captured.

Workflow

The diagram above is my workflow. Lets walk through the steps:

  1. Take the photo: This is the easy part, right?? Go ahead, capture your photographs. I personally like to keep every photograph I capture. A lot of folks I know delete the ones they don’t like on the camera itself. I’d rather prefer to see the picture on a bigger screen before I trash it.
  2. Copy the photo to the computer: Either you can connect the camera directly to the computer or use a card reader. Using a card reader is much faster. You can delete the photos from the card once you’ve copied them. However, do not format the card anywhere other than inside the camera.
  3. Copy the photo to an external storage: Use an external storage device like an external Hard Disk to store a copy of the photos from your computer. I know a few buddies who like to keep every photograph they click. I used to be like that as well, until I realised that I’d rather keep the ones I want. Its a personal choice, but remember that you can run out of space rather quickly.
  4. Make another copy of the photo on the computer: Now you’d ask, whatever for? Well, in the next step you will make changes to the original picture. I advise you work on a copy, with the original photo safely stored. That way, if you’re not happy with the modification work, you have an untouched original to fall back on.
  5. Post process the photo: Any modifications you make to the original captured picture is called post processing. This includes sorting, resizing, enhancing the colour, converting to black and white…. everything. This is where you can get creative, but remember you’re changing the original photo. So if you did not have a backup copy of that picture of the pretty cherry blossoms from your trip to Japan and you saved the picture accidentally as black and white, you might have to rely on a pretty vivid story to describe it to your friends. [Cherry blossoms also look nice in black and white though]
  6. Copy the finished photo to external storage: This is my important step. I copy all my creative post processed work to the external storage. This is the precious cargo. An additional step I do, because these are my final photographs, are to make a permanent copy of them on a CD or DVD. This way, I can delete them from my external storage if I need space.
  7. Copy the finished photo to an online storage: Online photo storage sites provide a nice way to keep your photos accessible on the net and enable a way to keep your photos at a remote location. Most sites allow you to have a small amount of storage space for free, with more storage and stronger security options if you pay a subscription fee. Flickr from Yahoo, Picasa Web Albums from Google and Photobucket are sites which are well recommended.
  8. Use the Photo: Well now you can send out the picture to your friends, print it, post it on your website.

So there you are, an easy workflow to follow. However, as I said, the workflow is very customized to the photographer. So feel free to add or delete any steps if you need it.


Some things to consider when you create and operate your digital workflow:

One single folder: On my computer and on the external storage, I store all my photos in a single folder. Under this folder, I make subfolders based on what the photos are about and then sort the photos into these folders. So, I’ll have a main folder called “Navin’s Photos” and inside it I’ll have multiple folders like “Bombay Vacation” and “Christmas 2008” and so on. This not only makes it easy to find photos in a hurry, but if I need to take a backup, I just make a copy of the entire “Navin’s Photos” folder and I’m done.

The copy folder: On my computer, I have a folder called “Navin’s Photos Copy”. This is a copy of the “Navin’s Photos” folder. It is from this folder that I do post processing on the photos. I save the finished photos in a third folder called “Navin’s Photos Final”. I make a copy of this “Navin’s Photos Final” folder on my external storage and to the internet storage.

Never use the default computer folder: All computers have a default folder where it stores pictures. In Windows, its the “My Pictures” folder inside “My Documents” folder. In Mac, its the “Pictures” folder inside the home folder. I advise not to use this folder to store your pictures, even if its the default location. Its often possible to miss this folder when you take a backup. But most important, this folder is accessed by default by most photo management software that you might use. It is better to have a separate folder created for your photo storage. You’ll have more control on that folder.

Be paranoid about backup: Trust me, there are more ways that you can lose photos than you can use them. So take multiple backups. My photo backups are as follows:

  • Raw photos: One copy on computer, one copy on external storage
  • Processed photos: One copy on computer, one copy on external storage, one copy on DVD and one copy online.
  • One copy of the raw photos and processed photos on another computer

Told you I can be paranoid!!

Limit the size of your external storage: Technology freaks like me love to indulge ourselves in gadgets. When I went shopping for an external hard disk, I was tempted to buy the big 1000 Gigabyte monster. However, it is more prudent to buy a smaller size, say 350 or 500 gigabytes, and fill it up before buying a new one. That way, if that hard disk crashes or you accidentally format it (it can happen more often than you think), you only lose what was on that disk. Now imagine if you formatted that one single 1000 gigabyte disk, all your photos would have gone. (Scary thought…shudder)

Be careful about what you store online: While the sites I mentioned before can be trusted with privacy and security, anything you put online is, in a way, out there!! So do not store anything online that you would not like others to see. These include private naughty pictures (hey, its your choice, just remember Paris and Pamela), sensitive locations etc. If you are not comfortable with other people seeing it, don’t put it online. Its better to copy it to a CD / DVD and lock it in your safe.

Stick to your workflow: I’ve known folks who get all enthusiastic about making a workflow. Then as time passes, they don’t stick to it and have photos in various folders inside their computer. Neither do they have backups. Take your time, be disciplined and sick to your workflow. That way, you’ll know where to find your pictures and rest easy if disaster strikes.

Have fun managing your photos. Do leave comments, feedback or questions if any. Until next time….

Sunday, March 6, 2011

Photo – A study in macro


One of the things that I always love doing with anything new, especially gadgets, is to figure out how to work the capabilities of that gadget. After reading the camera manual, I decided to test the settings.


This was taken in the afternoon, and as you must’ve guessed, this picture is underexposed. When I tried post processing, it was a rather harsh result. So I’ve left it at that.

As usual, please direct all comments and opinions here…. I’d love to learn.

Monday, February 21, 2011

Using the Aperture


If you’ve been following this blog recently, I explained what the whole deal was about the quintessential term APERTURE. If you need a refresher or want a hopefully simpler explanation than you’ve heard so far, do head back to the post: Technical Terms in Photography – Aperture.

ApertureNow that we know what Aperture is, its time to see what Aperture used for. As we saw, the Aperture is the opening in the lens which controls the amount of light coming onto the image sensor. The larger the aperture, the greater the amount of light falling on the image sensor and hence, the “brighter” the picture.

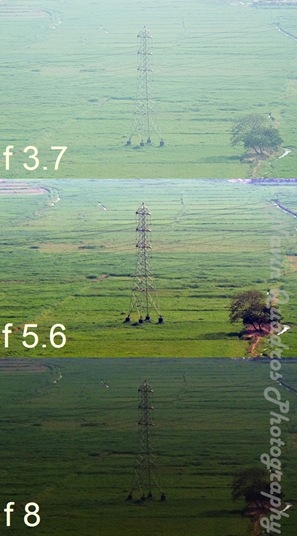
Let’s see the difference visually. The three photographs are from my window and shot in sequence at the same time of day. I varied the aperture setting on my camera and the setting is shown on each photo.

The photo in the middle is typically as close as possible to a correct exposure. Most of the detail is visible and the colours are well balanced out. This was on a bright day at a medium size aperture, f5.6.

The photo on the top is an overexposure. This means that there is more light in the photograph than is necessary. The result is a washed out image as if the whole scene was enveloped in a mist. As can be seen, the details are suppressed and the colours are very light. This is at a very large aperture size, f 3.7.

The photo at the bottom is an underexposure. As you might have guessed, this is due to inadequate light falling on the image sensor. The camera sensor is unable to capture the details and hence the image looks like it was captured at dusk under fading light. Again, the details are lost in the dark tones and colours are very dull. This is at a very small aperture size, f 8.

Exposure is a term that comes from the days of film photography. The amount of light to which the film is exposed to would determine how good the photograph is.

This amount of light is controlled by the size of the aperture and how long the film is exposed [shutter speed].

Getting a correct exposure manually is the holy grail of photography.

So in conclusion, the ability to get good detail and correct colours depends on the aperture being open at the right size for the existing light available. While it is also important to consider for how long the image sensor is exposed [The shutter speed], the aperture size will determine the correct amount of light needed for the scene to be captured well.

What aperture settings to use when?

The main determinant of aperture size, just like the human eye’s iris, is incoming light. Depending upon the amount of light in the scene, either the camera or you will have to adjust the aperture size. If the lighting is bright, the aperture should be small. If the lighting is low, use a bigger aperture.

A list of typical subjects being captured and the typical aperture size is given below:

f-stop

Used in situation when

f 1.4

Dark night landscape

f 2

Moon lit night landscape, stars

f 2.8

Night photos

f 4

For most situations in artificial light, like a bulb lit room

f 5.6

For most situations

f 8

For most situations with bright light, like a spot-lit performer or an outdoor shot on a bright sunny day

f 11

Sun lit objects other than snow like light coloured walls

f 16

Snow landscape on a bright sunny day, well lit white objects

f 22

Bright light, Sun lit snow

If your camera allows you to adjust aperture settings, it is important you learn to do this manually. This would not only give you more control on the photograph, but will also allow you to get more creative with the photographs.

A note to point and shoot camera owners: If your camera does not allow you to change aperture settings, do not feel bad. This essentially allows you to concentrate on composing good pictures, while ‘outsourcing’ the technical work to the camera. Your camera will have a number of SCENE modes which essentially are presets of aperture and shutter speed. So in a way, when you use each scene mode in the appropriate situation, you are effectively adjusting your aperture and shutter speed, with a little help from the camera :)

Another very important aspect of photography that is dependent on the aperture is Depth of Field [DoF], but that is the subject of another post.

Until then, do leave your comments and suggestions. I’ll also be happy to answer any questions that you might have.

Tuesday, February 15, 2011

Photo Tip – The half press


This is a new category of posts that I’m starting post Valentine’s day to let the love for photography spread. Every once in a while, I intend to post a photo tip that will help you improve your photography. I’ll post them as I learn them or when I have that “Oh yeah” moment, so watch out for these ones.

So here goes. The photo tip for today is: The half press button technique

How many times have you clicked a photograph and found it out of focus, blurred or hazy? You did everything right, positioned everything, held the camera steady, pressed the button in one smooth action…. yet, blurry picture!!

I clicked the below photo with my phone camera, which is a 3.2 megapixel autofocus camera using exactly everything that was mentioned above, positioned the subject, held the camera steady and pressed the button quickly in one go.

Box preThe result, as you can see, was good, but not very impressive. The photo is definitely not sharp and not worthy of the 3.2 megapixel camera that clicked it.

So what did I do wrong??

Well, its not exactly something I did wrong, but something I did not do.

And that something is the half press action.

The shutter release button is the button you press to capture the photograph. All autofocus cameras have the shutter release button which has two levels of press, the soft press and the full press.

  Button Press

Now lets do this practically. Turn on your camera and put your finger on the camera button. With a light pressure, press on the button and feel it go halfway down till you meet with some resistance. The camera should not yet have clicked the photograph. If your camera display is on, you’ll see a green square or a filled green circle at this point on your screen.

Now hold the button in this position. Congratulations….. you’ve just soft pressed.

By pressing the button halfway, you allow the camera to adjust its focus and settings for the best possible exposure. This is where the camera decides on the aperture size and the shutter speed. When you see the green framing square or the green circle, the camera is indicating that it has read the view and is ready to click the photograph.

Now you can press the button till you see the flash or hear that familiar click that tells you that you’ve just clicked the photo.

So what did I get when I followed the half press trick??Box post

Voila, as tack sharp and as clear a photograph as is possible. Once the camera has focussed and set itself up, the resultant photograph is much better. Definitely worthy of the 3.2 megapixel rating.

Remember, the half press works with every single autofocus camera, be it a humble mobile camera to a high end dSLR. The shutter release button on all cameras today have this type of two way construction. And it is always mentioned in the manual under the “Taking Photos” section. But then you never did read your manual, right??

What should I be careful about when using this tip?

Remember, when you half press the camera button, the camera takes a reading of what it is pointed at. but that is only till the time you keep the button depressed. If you release the button without clicking the photograph, the camera loses the reading. So while taking the picture, half press the button to take the reading till the green indication is seen on the LCD screen and then press further down to take the picture.

Also, if you take a half press reading while pointing at one scene and then point the camera at something else and click the picture, chances are that the resulting photograph would not be all that great. That is because the reading taken was for that scene only. To click another scene, take a half press reading for that scene, wait for the indication and then press the button fully to capture the photograph.

My camera does not have a button. I have a touchscreen. How do I do it?

This is a question I’ve got especially from mobile camera users. I have a mobile phone of this type. For some sad reason, mobile phone manufacturers decided to do away with the button in some phone models [See what happens when the designer is not a photography enthusiast?]

However, you can still use the half press trick provided your mobile phone has an autofocus camera. Point your camera at the scene you want to capture, press your finger on the designated area on the screen and keep it pressed there till you see the green indication on the screen.

Now take your finger off the screen to capture the photograph. You’ve got a focussed image. This screen pressing technique actually introduces some shaking when you release the screen, so you’ll have to practice to take steady shots.

So go on and try the half press technique. And do let me know if this helped your photography. As usual, queries and suggestions are welcome.